Foundation Design: Pile cap
Table of Contents
Pile Cap Design
Pile caps are a substructure element which is used to hold the piles in place (CFA piles, bored piles, steel piles etc.) and supports the superstructure. They support the columns of the superstructure and must be capable of transferring the column load into the piles.
Pile cap design involves analyzing the superstructure load path and determine the magnitude of force the pile cap undertakes. The pile cap is then designed and checked against large moments, shear and punching shear around the piles.
Pile cap design involves either 2,3,4 or more piles in the design and the number of piles depend on the loading and capacity of the piles.
They are designed using beam theory or truss analogy approach. The beam theory method is an easier method of design as it considers the pile cap a beam between the pile supports and the column as a point load. It is then designed as a normal beam for bending and shear.
There are important points to consider when designing a pile cap below:
- Increase the depth of the pile cap in 150mm increments, i.e, 750mm, 900mm and 1200mm (this is due to an excavator usually digging the ground in 150mm increments).
- Avoid using thin pile caps, as we want to avoid shear links in pile cap designs (it is hard to place links in 3 and 4 pile caps, so it is easier to avoid).
- Generally, the shear resistance of a concrete section can be increased through increasing the depth or increasing the rebar size (increasing depth is a better option as a 150mm increase of concrete will be cheaper than an increase in rebar diameter)
- Limit bottom and top reinforcement spacing to a minimum of 150mm. This will help avoid any clashes with column base plates, holding down bolts and the pile cap reinforcement.
- Piles cut-off levels are 75mm.
- Increase pile cap depth to allow for sufficient anchorage of the piles into the pile cap.
Pile Cap Design Example 1: Determine number of piles for foundation
A series of apartments is being constructed on clay ground. Ground investigation indicates a stiff clay strata and the geotechnical engineers have suggested a piled foundation solution with the calculated 450mm diameter pile capacity being 1000 kN. The structural engineers have determined the maximum column load of 1300 kN permanent load and 800 kN variable load.
The number of piles are determined from the pile capacity and SLS loading (un-factored loads).
The maximum unfactored load is 1300 kN + 800 kN = 2100 kN.
Number of piles = 2100 kN / 1000 = 2.1… Therefore minimum of 3 piles required (remember to consider the self-weight of the pile cap)
We will assume a minimum 1200mm pile cap depth.
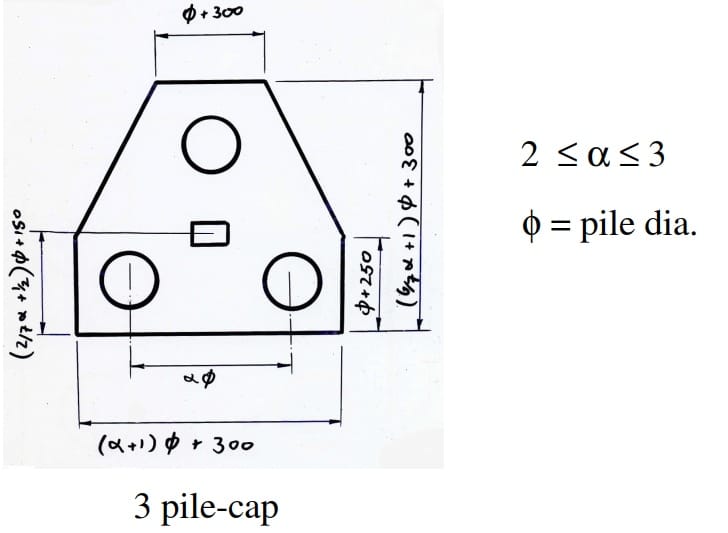
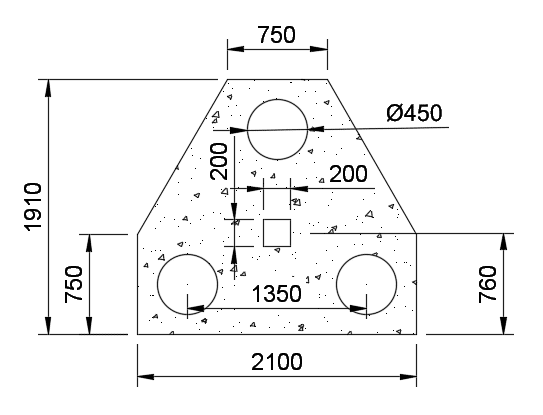
The pile cap diameter is 450mm, and we will take alpha as 3.0.
The plan area of the pile cap is 3.228m2 and depth is 1.2m. The total volume 3.874 m3. The pile cap self-weight is 25 kN/m3 x 3.874 = 96.84 kN. (we will take a 100 kN for ease of loading).
Pile Cap Design Example 2: 3 Pile Cap Design
The 3 pile cap that was determined in the previous example will now be designed in accordance to beam theory.
Total permanent Load = 1400 kN
Total Variable load = 800 kN
The total ULS load = 1.35 x 1400 + 1.5 x 800 = 3090 kN which will act centrally (column location).
Effective depth to bottom reinforcement = 1200 mm – 75mm – 25/2 = 1112.5mm
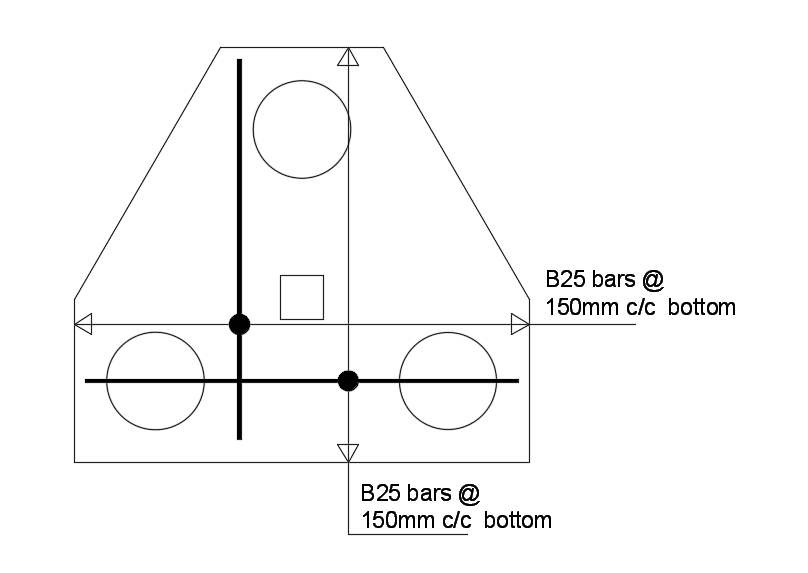
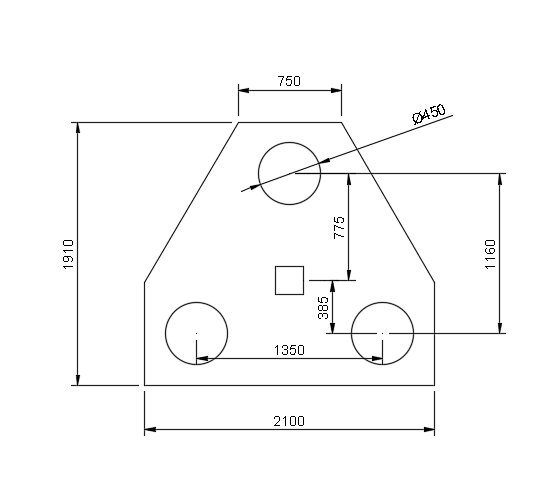
The easiest way to look at the pile cap is to draw out beams between the supports as shown below and then calculate the required reinforcement.
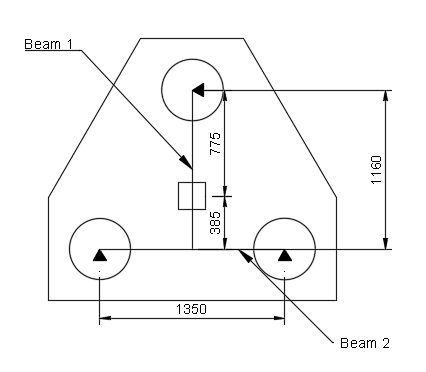
Beam 1
The maximum bending moment for a point load is Pa.
M = 3090 x 0.385 = 795kNm
Reaction on support = 3090 x 385/1160 = 1025 kN
Support on Beam 2 = 3090 – 1025 = 2065 kN
Bending reinforcement
K = M/bd2fck = (795x 106)/(750 x 1112.52 x 32) = 0.027 < 0.167, no compression is required
From the lever-arm curve, la can be determine or z = d[0.5 + √(0.25-K/1.134)]
\(z = 1112.5[0.5 +\sqrt 0.25 – 0.04/1.134] = 1074mm\), check if this is less than 0.95d (0.95 x 1112.5 = 1057mm)
Use z = 1057mm
\(A_s = \frac{M}{0.87f_{yk}z}\) = (795x 10^6)/(0.87 x 500 x 1057) = 1730mm2/m
Therefore, provide B25 bars @ 150mm c/c, As = 3273 mm2.
Check Bar stresses
Stress in reinforcement can be checked through the equation below:
\(\sigma_s = \frac{f_{yk}}{\gamma_{ms}} \frac{\psi_2 Q_k + G_k}{1.5Q_k + 1.35 G_k} \frac{A_{s,req}}{A_{s,prov}} \frac{1}{\delta}\)
where \(\psi_2\) can be taken from the table NA.A1.1, which contains values for buildings.
\(\delta\) can be taken as 1.0
\(\frac{f_{ck}}{\gamma_{ms}}\) = 435 for 500 MPa reinforcement.
Stress in reinforcement can be checked through the equation below:
\(\sigma_s = 435 \frac{0.7 \times 800 + 1400}{1.5 \times 800+ 1.35 \times 1400} \frac{1730}{3273} = 225 MPa\)
We can check the 220 MPa on the allowable stresses for bars. The maximum bar spacing can be taken as 200mm.
We have chosen a bar spacing of 150mm, which is less than 200mm.
Beam 2
The maximum bending moment for a point load is Pa, where P is the force and a is the distance to support.
P = 2065 kN (ULS)
SLS permanent = 1400 – (1400 kN x 385/1160) = 935 kN
SLS variable = 800 – (800 kN x 385/1160) = 535 kN
M = 2065 x (1.35/2) = 1394 kNm
Reaction on support = 2065 x 0.5 = 1033 kN
Bending reinforcement
K = M/bd2fck = (1394 x 106)/(750 x 1112.52 x 32) = 0.047 < 0.167, no compression is required
From the lever-arm curve, la can be determine or z = d[0.5 + √(0.25-K/1.134)]
\(z = 1112.5[0.5 +\sqrt 0.25 – 0.047/1.134] = 1054mm\), check if this is less than 0.95d (0.95 x 1112.5 = 1057mm)
Use z = 1054mm
\(A_s = \frac{M}{0.87f_{yk}z}\) = (1394 x 10^6)/(0.87 x 500 x 1054) = 3040 mm2/m
Therefore, provide B25 bars @ 150mm c/c, As = 3273 mm2.
Check Bar stresses
Stress in reinforcement can be checked through the equation below:
\(\sigma_s = \frac{f_{yk}}{\gamma_{ms}} \frac{\psi_2 Q_k + G_k}{1.5Q_k + 1.35 G_k} \frac{A_{s,req}}{A_{s,prov}} \frac{1}{\delta}\)
where \(\psi_2\) can be taken from the table NA.A1.1, which contains values for buildings.
\(\delta\) can be taken as 1.0
\(\frac{f_{ck}}{\gamma_{ms}}\) = 435 for 500 MPa reinforcement.
Stress in reinforcement can be checked through the equation below:
\(\sigma_s = 435 \frac{0.7 \times 535 + 935}{1.5 \times 535+ 1.35 \times 935} \frac{3040}{3273} = 220 MPa\)
We can check the 256 MPa on the allowable stresses for bars. The maximum bar spacing can be taken as 175mm.
We have chosen a bar spacing of 150mm, which is less than 175mm.
Check Shear of pile cap
It is useful to avoid shear links in 3 pile caps due to its orientation. It is more practical to design it without shear reinforcement but this must be checked in the design.
There are 2 shear planes and the shear force can be reduced for point loads near supports as specified in Eurocode 2, section 6.2.2, clause (6). The shear force can be reduced by \(\beta= a_v/2d\) where \(\beta\) is limited to 0.25 (25%).
\(a_v\) is the distance to the shear plane and it is the distance from the column edge to 1/5th away from the pile edge.
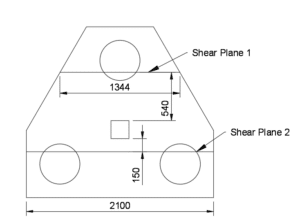
Shear Plane 1 Check
Shear force has been calculated at that support as 1025 kN
(\V_ed\) = 1025kN
\(v_{ed} = V_{ed}/bd\) = (1025 x 103)/(1344 x 1112.5) = 0.686 N/mm2
\(a_v\) = 540mm, therefore \(\beta = 540/ (2 \times 1112.5)\) = 0.24 … Limit to 0.25
\(v_{ed} \times \beta\)= 0.686 x 0.25 = 0.172 \(N/mm^2\).
\(\rho\) = 100 x 3273/ (1000 x 1112.5) = 0.3
\(V_{rdc} = v_{rdc}bd\) where
\(v_{rd,c} = [0.12k \times (100 \times \rho \times f_{ck})^{1/3}] \)
where \(K = 1+ \sqrt{200/d}\)
where \(K = 1 + \sqrt{200/1112.5} = 1.42\)
\(v_{rd,c} = [0.12 \times 1.42 \times (100 \times 0.003 \times 32)^{1/3}] = 0.36 N/mm^2 \)
\(v_{min} = 0.035 \times k^{3/2} \times f_{ck}^{1/2}\)
\(v_{min} = 0.035 \times 1.42^{3/2} \times 32^{1/2} = 0.34 N/mm^2\)
vrdc > ved …OKAY
No shear reinforcement is required
Shear Plane 2 Check
Shear force has been calculated at that support as 2065 kN
(\V_ed\) = 2065kN
\(v_{ed} = V_{ed}/bd\) = (2065 x 103)/(2100 x 1112.5) = 0.884 N/mm2
\(a_v\) = 150mm, therefore \(\beta = 150/ (2 \times 1112.5)\) = 0.07 … Limit to 0.25
\(v_{ed} \times \beta\)= 0.884 x 0.25 = 0.221 \(N/mm^2\).
\(\rho\) = 100 x 3273/ (1000 x 1112.5) = 0.3
\(V_{rdc} = v_{rdc}bd\) where
\(v_{rd,c} = = 0.36 N/mm^2 \)
\(v_{min} = 0.34 N/mm^2\)
vrdc > ved …OKAY
No shear reinforcement is required
| Alternative requirements to control crack widths to 0.3mm for members reinforced with high bond bars | |
|---|---|
| Maximum bar diameter (mm) |
Stress range (MPa) |
| 40 | 150-165 |
| 32 | 165-190 |
| 25 | 190-210 |
| 20 | 210-230 |
| 16 | 230-260 |
| 12 | 260-290 |
| 10 | 290-320 |
| 8 | 320-360 |
| Alternative requirements to control crack widths to 0.3mm for members reinforced with high bond bars | |
|---|---|
| Maximum bar spacing (mm) |
Stress range (MPa) |
| 300 | \(\leq\) 160 |
| 275 | 160-180 |
| 250 | 180-200 |
| 225 | 200-220 |
| 200 | 220-240 |
| 175 | 240-260 |
| 150 | 260-280 |
| 125 | 280-300 |
| 100 | 300-320 |
| 75 | 320-340 |
| 50 | 340-360 |
